
Tea Light Candle Holder
November 12, 2018
The following is an excerpt from an upcoming article entitled “Handmade Gifts” by Christian Becksvoort (Issue #264 Nov/Dec 2017).
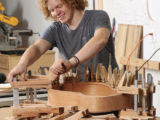
Here is a great chance to use scraps, no matter the species. It’s also a chance to get creative. Although my tea light candle holders are all tidily rectilinear, feel free to offset the parts and expand the sizes, numbers, shapes, and layouts. If you’re a turner, turn a disk and drill holes in it. If you’re a carver, shape and carve a nice slab and drill holes to suit. Most tea lights will fit into a 1-1⁄2-in.-dia. hole. If you want to get fancier (and safer, in my opinion), use glass inserts. You can turn out a bunch of these gifts in a morning.
For my holders, I milled a stick 1-7⁄8 in. square by about 12 in. to 16 in. long, and cut it into short lengths on the tablesaw. I drilled one end of each piece with a 1-1⁄2-in. Forstner bit. Then I glued three together with a hand-screw clamp, keeping them aligned during glue-up by holding them in a bench vise. When the glue was dry, I sanded the sides and planed the bottoms to get the unit perfectly flat. Then I glued the sub-assemblies together, and finally rabbeted around the bottom to create a foot.
Cut and Drill:


Glue up in two stages:


Adding a rabbet creates a base:


Review by: Christian Becksvoort