
How To Make Inexpensive Cam Clamps
November 12, 2018
Synopsis: Luthier Nathan Murphy makes these light-duty cam clamps for a fraction of what they’d cost to buy. Their simple mechanism, in which a lever exerts pressure on a tongue using cam action, makes them quick to build and have on hand whenever you have to hold a couple of small parts together. Use any wood you choose, but preferably something with straight grain. The two jaws of the clamp are the same length, so there is a minimum of measuring required.
As a luthier, I always need a lot of clamps that apply light, firm pressure, and these little cam clamps are the perfect tool for the job. They come in handy with furniture, too, any time you need to hold a couple of small parts together.
The cam clamp’s mechanism is simple

The lever applies pressure on the tongue, which tightens on the workpiece. The lever’s pivot pin is off center, creating a cam action, so the lever exerts more pressure the farther you pull it. Two pins then lock against the metal bar to keep the sliding jaw from moving. The clamps don’t apply huge pressure, but it’s enough that you don’t want to clamp your fingers in them (I know from experience). Cam clamps can cost close to $20 apiece; I make them myself for about a tenth of that.
A stack of blanks
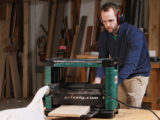
I begin crosscutting the jaw blanks to length at the chopsaw. The sliding and fixed jaws are the same length, so you have to measure only once. Cut the aluminum bar stock to length at the chopsaw now too. I get this stock from Online Metals.

You can use almost any wood for these cam clamps. I’ve had success with oak and cherry. Whatever you use, try to look for straight-grained pieces and mill it so the grain runs vertically on the ends. Knots, grain runout, and horizontal grain can weaken the jaw. Grain direction is less critical for the lever.
I generally like to cut more blanks than I plan to use, because some of them will end up as test pieces for setting up to drill the pins.
Next, make the recess in the middle of the blanks to leave space for the jaws to grip while tightening. I nibble out the waste on a tablesaw with a crosscut sled.

When cutting the slots at the back end of the jaws for the aluminum bar, raise the tablesaw blade to 1-1⁄2 in. Even though the bar is only 1 in. wide, the slot should be deeper to leave room for the roll pins you’ll install later. Also, make the slot 1⁄32 in. wider than the thickness of the bar to let the movable jaw slide. Afterward, chamfer the edges of the jaw.
Separate the blanks into two piles, one for the fixed jaws and the other for the sliding ones. From now on you’ll work on them separately.
Sliding jaws have bite
The sliding jaws require two more cuts: a slot for the lever and a bandsaw kerf that creates the flexible tongue. I first cut the slot for the lever. Using a 1⁄4-in. dado blade, set up a stop block and featherboard to make the stopped cut. Then turn off the saw, wait for the blade to stop, and back the jaw out of the cut.
Review by: Nathan Murphy